UNDER CONSTRUCTION………..
Category: Herbs, Oils, & Natural Wellness
Herbs, Oils, & Natural Wellness
Cleavers…..Where to find them? How to identify them? What benefits do Cleavers have medicinally?
Under Construction
Purple Dead Nettle….How To Identify It…..What Medicinal Qualities Does Purple Dead Nettle Have? Where To Find It?
Ahhhh, what are those GORGEOUS purple flowers that are covering that field??? Well, they just might be PURPLE DEAD NETTLE.
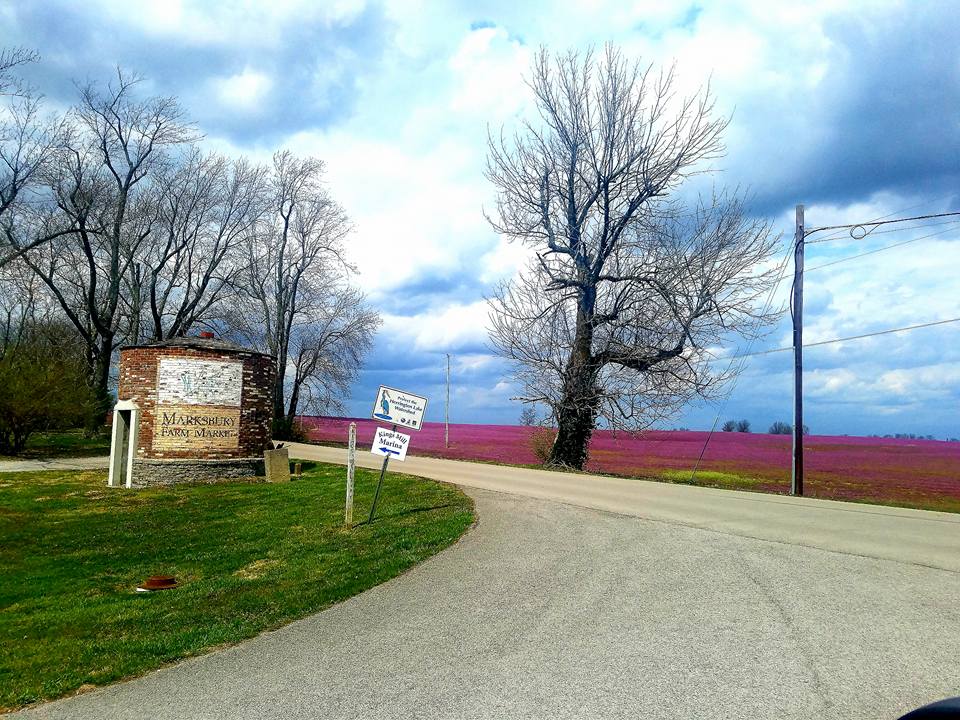
Have you ever been driving down a country road in MARCH and see fields of purple as far as the eye could see? As you can see in the photos in this article, there is plenty of PURPLE DEAD NETTLE (to be found in Kentucky. I took these photos in April near my home. GORGEOUS to the eye when in full purple bloom, but the leaves are kind of purplish green and dull when matured…..This plant is normally found in the Northern hemisphere between the months of April – October.
You might wonder why it is named ‘DEAD’ nettle? Well, that answer lies in the fact that STINGING NETTLE literally STINGS, yet, this nettle has soft hairs on its leaves and doesn’t harm the skin when touched. It originated in Europe.
However, the health benefits of these plants are many. PURPLE DEAD NETTLE ( Lamium purpureum) is known to be a diuretic (causing increased urine), an astringent (constricts skin cells/pores), a purgative (laxative like effect), a diaphoretic (causes sweating), and even known to be a styptic (causes bleeding to stop when applied to wounds). Add it to poultice recipes. …The fresh LEAVES of this plant can be used on external wounds or cuts. Yes, that pretty little flowering plant is beneficial if you know how to use it. (A poultice can be made by crushing fresh leaves onto a cotton bandage and securing the bandage to the wound area). It’s that simple.
I harvest and dry the leaves each spring and keep them in a labeled jar. Having them in a jar in my pantry makes it so nice to add PURPLE DEAD NETTLE LEAVES to green smoothies, add to soups (cold & hot), quiches, tea blends, sprinkle them on my eggs, add to salads, etc… I use the fresh leaves for salad greens in the Spring. I also keep dried leaves for spice and rub blends. They don’t have a bold taste, but the nutrients are great. Remember, DRIED leaves are MUCH stronger than the FRESH leaves….The strength factor of components is like a 1:3 ratio (dried vs fresh). At least this is what I’ve always been told by my grandmother.
This little ‘wonder’ plant can be used as an ANTI-INFLAMMATORY, ANTI-FUNGAL, & ANTI-BACTERIAL. This plant is part of the MINT FAMILY of plants…. It’s young leaves can be eaten freshly picked by adding to SPRING SALADS. Note that the tiny ‘hairs’ on the leaves do not sting as they do on its COUSIN, ‘STINGING NETTLE’………
Many of this plants benefits are similar to PLANTAIN LEAF benefits. Especially, when used to stop bleeding and wound healing. It is packed with vitamins. Vitamin C is one of those vitamins, as well as having iron & fiber. <3
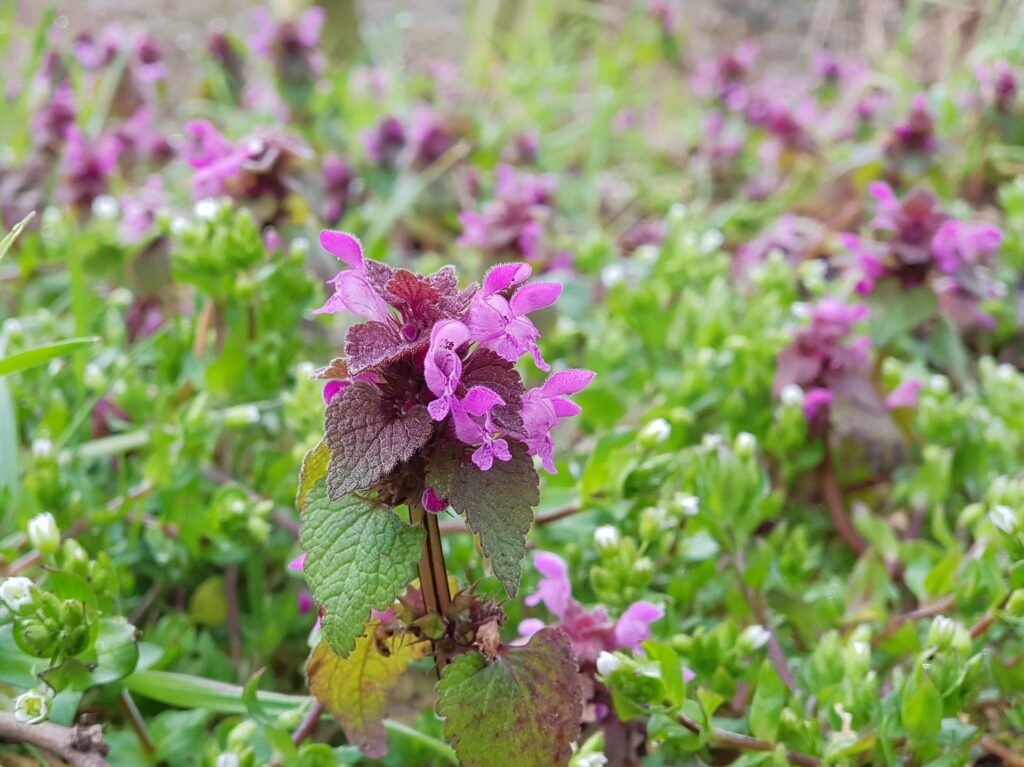
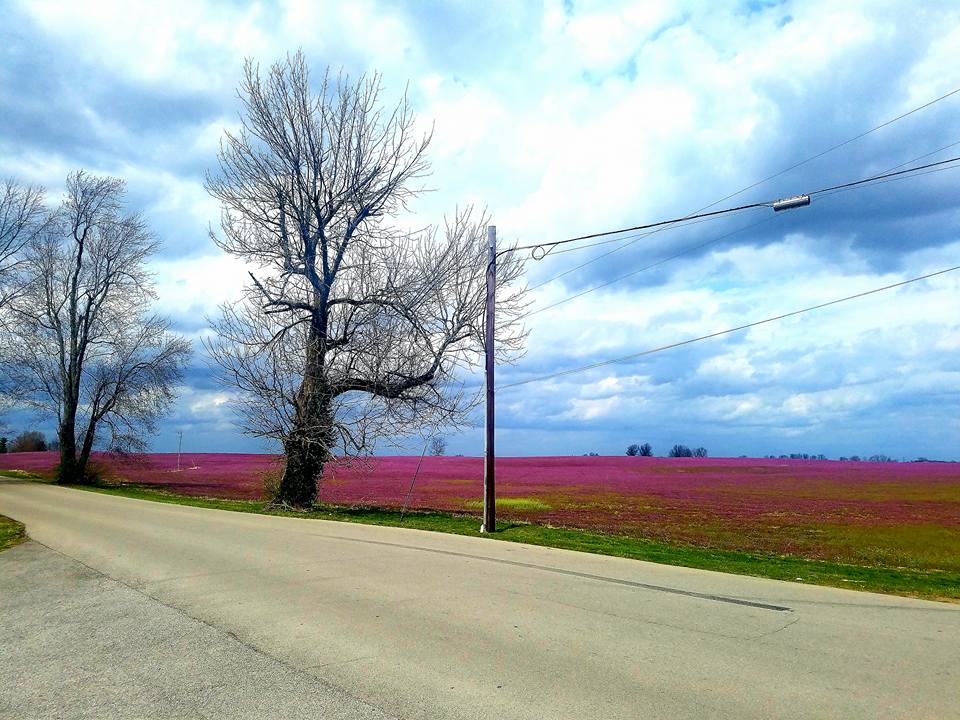
Let us start with a nice PURPLE DEAD NETTLE TEA recipe.
___________________________________________________________________________
PURPLE DEAD NETTLE TEA
5 Tbsp. Dried PURPLE DEAD NETTLE LEAVES
10 oz Distilled Water
Place dried PURPLE DEAD NETTLE leaves in water in saucepan until they come to a boil. Turn off burner and allow to steep for 10 minutes. Strain leaves and add sweetener to the tea according to your taste. I use MONK FRUIT sweetener, but you can use ORGANIC STEVIA, if you want.
___________________________________________________________________________
___________________________________________________________________________
PURPLE DEAD NETTLE TINCTURE
Fill a pint size mason jar with fresh, clean PURPLE DEAD NETTLE LEAVES.
Fill the jar by pouring EVERCLEAR GRAIN ALCOHOL (190 PROOF) over the top of the PURPLE DEAD NETTLE LEAVES. Place a lid on the top and seal the jar well. Leave in a dry, cool, dark place. I usually sit mine in my cabinet and shake occasionally over the next 6 weeks.
In 6 weeks, strain the plant material out of the tincture, bottle into smaller dropper size bottles and label well.
You can use externally or internally. Drop a few drops under the tongue, hold for about 2 minutes and swallow. You can also use drops externally for wounds or bug bites. I put the drops on a bandaid to assist in healing.
**Always ask your doctor before using any product whether topically or internally.
___________________________________________________________________________
Keep in mind that there is another plant that is a ‘look-alike’ to PURPLE DEAD NETTLE. Its called HENBIT (Lamium amplexicaule ) and it has leaves that are a bit more GREEN, whereas, PURPLE DEAD NETTLE
(Lamium purpureum) have leaves that are more of a purplish green and grow in clumps, as opposed to the heart-shaped, scalloped edged leaves of HENBIT. Whereas, the PURPLE DEAD NETTLE leaves are triangular in shape. So, don’t freak if you get HENBIT because both are edible.
Below, I have posted a photo of HENBIT. It’s hard to tell the difference between HENBIT & PURPLE DEAD NETTLE unless you know the leaf properties. These plants are native to Europe, Asia, & Africa.
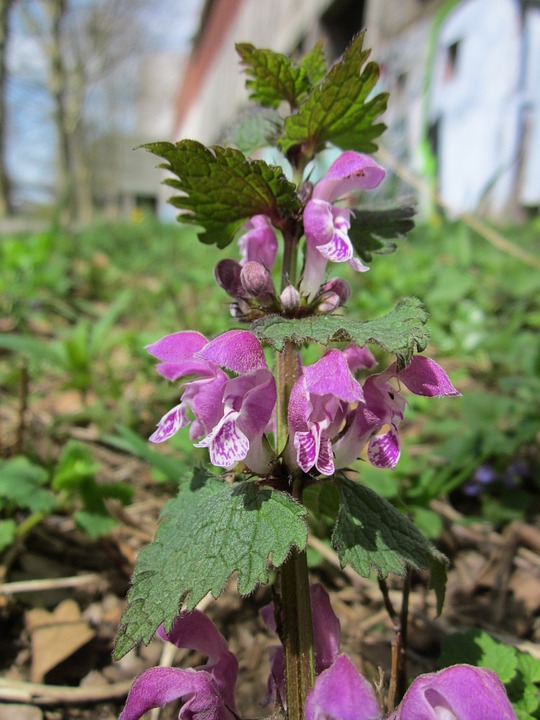
(Lamium amplexicaule)
Often confused for PURPLE DEAD NETTLE.
Both have edible LEAVES.
Although PURPLE DEAD NETTLE & HENBIT can be eaten by humans, it does cause some concerns in birds & animals. Cows, horses, & sheep can have ‘dizzy’ spells after eating this plant. They seem to naturally avoid the plant. However, rabbits & chickens find it quite appealing. Hummingbirds LOVE the nectar from the flowers of both plants.
As many of you know, I love the bees. I had my own hives for a time period and used the venom for therapy purposes. In the early Spring, the bees don’t have many options for nectar. PURPLE DEAD NETTLE & HENBIT flowers make for a perfect nectar source for the bees.
___________________________________________________________________________
EARLY SPRING SALAD
Bunch of fresh PURPLE DEAD NETTLE LEAVES ….TORN APART
Bunch of fresh DANDELION Leaves…CHOPPED
Early homegrown LETTUCE……TORN APART
1 small bunch of CILANTRO leaves diced…..DICED
Hand full of Pine Nuts to sprinkle throughout the greens.
3 DICED Tomatoes
FETA Cheese crumbled & sprinkled throughout the mix.
__________________________________
DRESSING:
6 Avocados…SCOOPED into a large mixing bowl
5 TBSP Honey
Lemon or Lime Juice
Himalayan Salt to taste
Mix together well until creamy. Add more Lime Juice to make creamier. Drizzle over fresh green salad.
___________________________________________________________________________
Note that we are all individual and unique. Therefore, there is always a chance of toxicity or allergic reactions when ingesting or topically using any plant or product. Be cautious, research yourself, ask your physician, and know that your actions are of your own accord. NO ONE is responsible for your actions except you. Extensive research has not been done on these recipes shown within this blog. I take no responsibility for your decision to ingest or use topically any of the recipes herein. Test your reaction to all plants before you use any plant or product without caution. ALL content in this blog is for educational purposes only. You MUST consult with your physician before following any of the content herein this blog. I am only sharing generalities for educational purposes. I am NOT a physician, scientist, nor your Momma…..Be Cautious!
Yarrow……….Nature’s Sacred Herb…..Found throughout the world… What are the medicinal properties of Yarrow?
UNDER CONSTRUCTION
Teasal Root….(Dipsacus Sylvestris)….Wild Weeds That Assist Naturopaths In Treating Lyme Disease … How I used Teasel Root in my Lyme treatment. Where to Find Teasel Root? Will Teasel Root Make Me HERX??
UNDER CONSTRUCTION…….COMING SOON.
PURSLANE……What is it? Where do I find Purslane? How to use Purslane for wellness purposes? Purslane product recipes
UNDER CONSTRUCTION……COMING SOON….
Dandelions are NOT weeds!!! Dandelions are a SUPERFOOD… Making wellness products with DANDELIONS…
UNDER CONSTRUCTION……COMING SOON
Stinging Nettle…..Genus Urtica….It’s benefits, components, where to find it, how to harvest it, and Nettle recipes for wellness.
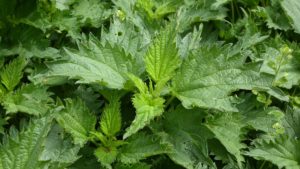
Early Spring is the time that everyone harvests Stinging Nettle. Nettle is one of the earliest plants of Spring.
WHAT IS NETTLE?
Nettle……Nettle is a very nutrient dense green food. It tastes similar to spinach and is often substituted in recipes for spinach. Nettle packs a very potent healing capacity, as well.
I was so delighted to see NETTLE coming up in my herb garden this year… I planted it last year and today was exciting to see that it survived through the winter and is thriving in its little corner of my herb beds… I can’t wait until it starts spreading. Nettle spreads quick in a garden.
The first time I ever tasted nettle was in Romania about 13 years ago. I ate nettle stew while I was there visiting family…Oh, it was delicious!!…. In Romania, the older women sit along the roadsides in wooden ladderback chairs with their long dresses, their homemade, multi-colored, wool, knit socks & all seem to have varied colored scarves tied over their heads with huge baskets of nettle for sale at their feet. They sell stinging nettle during the early Spring months… (Its an amazing site to see because, unlike the older Southern women in the USA, the Romanian women that are from the country could care less about matching scarves, socks, or clothing). Nettle time brings some really wonderful cultural sites along the roads of Romania. Simple times and loving people.
If you have never experienced the herbs, fruits, & garden produce of Europe, you are missing a great surprise…. The markets there are GORGEOUS and the produce is immaculately clean & in organized stacks… I enjoyed walking through the marketplaces and seeing all the herbs & beautiful produce in perfect presentation…
Europeans have MUCH healthier food than we have in the US. I searched ‘high & low’ to find myself a simple little SNICKERS bar…lol. They do NOT fill their shelves with junk foods, foods with preservatives, not many prepackaged foods, snacks, nor foods with tons of additives. Natural whole foods are what you find in their marketplaces.
Fast foods and billboards of food are not clogging the city streets in any European city. It’s an entirely different world there. Europe is just a much healthier continent, overall. You will find Europeans to still know & use many of the natural health secrets used by our ancestors. Whereas, Americans have had them slowly removed from our lifestyles by ‘the powers that be’… SICKNESS fuels TOO MANY industries in America. Its BIG BUSINESS here… ONLY ‘YOU’ can take back your self-healing power by learning ‘natural healing options’ for yourself & your family.
Let’s look at the health benefits of STINGING NETTLE…
There are multiple species of nettle scattered around the planet. In fact, there are well over 40+ types of nettle. It is known for its sting and skin rash that the tiny ‘spikes’ or ‘stinging fuzz‘ cause when an arm or leg is brushed against the leaves. This ‘sting’ causes a histamine reaction in the body. It usually subsides after a day or so, but it hurts when you get stung by nettle. Maw always made baking soda poultices to help the stinging to decrease.
NETTLE CONTAINS SOME GREAT HEALTH BENEFITS :
- PREVENTS DIARRHEA
- REDUCES GINGIVITIS BLEEDING OF GUMS
- STIMULATES HAIR GROWTH
- PROMOTES LACTATION FOR NEW MOTHERS
- CONTROLS BLOOD SUGAR IN DIABETIC PATIENTS
- USED AS AN ASTRINGENT
- GREAT FOR JOINT PAIN
- STIMULATES KIDNEY ‘IRRIGATION TO HELP WITH FLUSHING KIDNEY STONES
- URINARY TRACT TREATMENT
- DIURETIC
- TREATS ACNE
- IMPROVES SKIN
- GREAT FOR ECZEMA
- ALLERGY RELIEF
- BONE HEALTH BY PROVIDING MAGNESIUM
- TREATS ANEMIA
- VITAMIN A,C,D, & B COMPLEX
- PHOSPHORUS, IRON, CALCIUM, PROTEIN, MAGNESIUM, & BETA CAROTENE
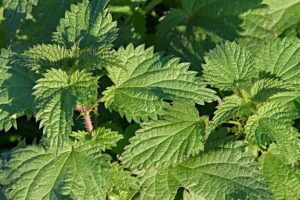
Check out the stinging hairs on the stem & on the leaves of this Nettle plant. OUCH!!
Where Can You Find Nettle?
Well, it is often found on the banks of creeks, rivers, lakes, etc… In fact, I found a big area of nettle growing last year near the creek bank on one of my Amish friend’s farms. They used it for their family medicinal salves. Nettle is commonly found in Western North America, United States, Canada, Europe, Asia, South America, and Africa.
For Nettle Supplement Capsules……….Click HERE.
How Do I Harvest Nettle?
VERY CAREFULLY…LOL. Timing is EVERYTHING. You must harvest the leaves when they first pop up in early Spring. Use gloves to pick the top 4 leaves of the plant. Place those leaves in a brown paper bag for transport. Make sure you respect the plant because you can continue to harvest this plant year after year. I will add some recipes for various medicinal projects and also a Nettle Soup recipe at the end of this blog post. When gathering for tea, it takes about a cup’s worth of leaves to use for steeping a cup of tea.
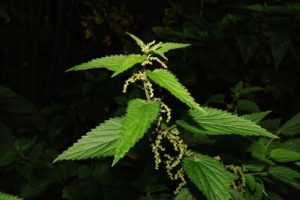
This nettle plant is a more mature plant and although the leaves can be used medicinally, the early SPRING leaves are best for making nettle soup. The older the plant is in the growing season, the more chances of getting stung. The more mature plants have stronger hairs. So be very careful when near stinging needle after early Spring
What Substances Are In The Sting From Nettle?
Well, I’m glad you ask….:) Nettle stings pack a sharp cruel sting and they inject FORMIC ACID, TARTARIC ACID, OXALIC ACID, HISTAMINE, SEROTONIN (5-HYDROXYTRIPTAMINE (monoamine neurotransmitter)), & ACETYLCHOLINE with their tiny little hollow hairs called TRICHOMES….Being stung by nettle is a rather nasty, painful little event, to say the least… The HISTAMINE is the ‘villain’ that causes the skin reaction to be so drastic. It usually takes about 24 hours for the pain to subside completely.
How To Treat Nettle Stings?
- Baking Soda & Water Paste Poultice
- Plantain Paste Poultice
- Antihistamine Creams
- Calamine Lotion
- Burdock Leaves
Keep this bit of information ‘under your hat’. In many countries, the women that go out into the fields to pick Nettle DO NOT use gloves. Instead, they pick with their hands and feel that the ‘stings’ are just ‘medicine’ and that the stings help them with their arthritis pain. They do not complain of ‘injury’ from the stings. It’s their ‘way of life’ to pick Nettle with no gloves.
For NETTLE SEEDS to plant in your herb garden or farm ….Click HERE.
NETTLE RECIPES
NETTLE IS A SUPERFOOD!!! Vitamins A, C, IRON, MANGANESE, CALCIUM, & IRON
- Nettle Tea
- Nettle Pesto
- Nettle Soup
- Nettle Salves
- Nettle Tincture
- Nettle Infused Oil
- Nettle Infused lemonade
YOU WILL NOTICE THAT I HAVE LINKED MANY OF THE INGREDIENT OR EQUIPMENT ITEMS NEEDED TO COMPLETE EACH RECIPE BELOW. I DID NOT LINK GROCERY ITEMS THAT YOU CAN PICK UP EASILY IN A LOCAL GROCERY STORE. I DID LINK THE ITEMS THAT YOU MAY BE NEEDING A SOURCE TO COMPLETE THE RECIPE.
Nettle Tea
- Fresh Nettle Leaves…(Pick 1 cup of fresh Nettle leaves for each cup of tea that you want to prepare.)…………….
- OR
- 2 heaping tablespoons of dried nettle packed into a stainless steel tea infusion ball………………For dried Nettle……. Click HERE
- 1 cup Spring Water
- Organic Powdered Stevia………………..Click HERE
- Stainless Steel Tea Infusion Ball…….Click HERE
Boil Distilled or Spring Water. Once boiled, hang infusion ball with nettle inside a cup of boiled water. Let this steep for 10 minutes, remove, add stevia, stir, & drink.
Nettle Pesto
- 1/2 lb Nettle leaves………………Click HERE
- 3/4 cup Roasted Pine Nuts……Click HERE
- 1/3 c. COLD PRESSED EV Olive Oil…..Click HERE
- 2 Garlic Cloves
- 2 1/2 Tbsp Lemon Juice
- Salt/Pepper to taste
- 1/2 c. Parmesan Cheese
Prepare a pan of boiling water. Once the water is boiling well, add fresh nettle leaves. Only allow nettle leaves in the boiling water for about 60 seconds… Remove & drain very well.
After nettles are drained well, add them to your blender.
Add pine nuts, garlic, olive oil, parmesan cheese, sea salt or Himalayan salt, & lemon juice.
Blend, refrigerate, & its ready to serve when chilled.
Nettle Pesto can be used as a dip, mixed with fettucini noodles to make a great dinner and served with toasted garlic bread, or just spread on toast. You’ll LOVE it and so will your family. ![]()
Gherghina’s Romanian Nettle Soup
- 4 qt pan full of clean Nettle leaves…….Click HERE
- Water for boiling Nettle leaves
- Salt to taste
- 2 onions minced
- 3 carrots shredded
- 1/2 c. rice
- 1/2 oz. Cold Pressed Olive Oil……………Click HERE
Boil until nettles, rice, & vegetables are all tender. Serve in soup bowls. (Can add apple cider vinegar to taste, if you like.) In Romania, they serve this soup with Mamaliga (Romanian version of cornmeal). I’ll include a quick recipe for the Mamaliga from my husband’s recipes. He is Romanian and this is a STAPLE for that man!!! Lawd, he loves Mamaliga …. I am quite fond of it myself. It was an ‘acquired taste’ for me. However, I am ‘sold’ on it now.
ROMANIAN Mamaliga
(Romanian version of ‘cornbread’ or more like ‘cornmeal mush’ as I call it….lol.. It compliments any soup, stew, or broth very well.)
- 1 cup Polenta………..Click HERE
- 3.5 cups of water
- 3 Tbsp butter (Preferably Grass Fed Cow’s Butter)
- 1 Tsp Himalayan Salt
- Sour Cream
- Extra Cow’s Butter
Boil water, add salt, 1 Tbsp butter, and 1 cup of polenta. Lower heat and stir constantly until complete mixture thickens and is boiling. Cover and continue to boil for about 12 minutes. The mixture will thicken so that you can test it with a wooden spoon. Wet the spoon and slide it into the mixture. If it comes out clean, then the Mamaliga is FINITO!!!
My husband is a Romanian Chef and he pours his Mamaliga into glass bowls BEFORE it sets completely in the pan and lets it cool in the bowls. The Mamaliga sets when cooled and he keeps the bowls in the refrigerator. It is great to eat warm, but we often eat it cold, as well. I LOVE it!!! We slice ours and serve on the plate in cold slices sometimes. When we serve warm, we often add butter & sour cream to the top of each slice served…
NOTE!!! I said not to discard the water that the nettles were boiled in when making the soup. This is EXCELLENT water to drink for vitamins/minerals OR to use to rinse your hair in after shampooing. I do the 2nd rinsing of my hair in nettle water during the Spring.
Nettle Salve
You can make your own salve or if you prefer to buy Nettle Salve………Click HERE
- 1 cup COLD PRESSED Olive Oil …….Click HERE
- 1.5 oz dried Nettle leaves ……………….Click HERE
You can make the salve in multiple ways, but first, you must decide the way that best suits your availability to the infused oil that you will need to mix with the other items to make the salve.
If you want to do a quick infusion of oil, then the above ingredients is how you will start this step. Put 1 cup of cold pressed olive oil and 1.5 oz of nettle leaves in a baking dish in the oven on 200 degrees for about 3 hrs, 15 minutes. This will result in the oil being infused with all the wellness components of the nettle leaves.
OR
If you don’t want to infuse the oils at the last minute, you may use infused oil that you have already made via allowing the leaves to sit in oil for several weeks. I will add a recipe for making a slow infused nettle oil in this section.
Once you have your oil infused, then you will need: I have included a link to a source for some items. You may not need these sources, but if you do, I included a link to them. By adding the link to the ingredient list at the top of each recipe that keeps me from having to add an entire source page at the end of this post.
- .75 oz grated beeswax…….Click HERE
- Tins…………………………………..Click HERE
- Labels……………………………….Click HERE
- 5 capsules VITAMIN E for preservation purposes………….Click HERE
- Glass bowl
- Cheesecloth ………………………Click HERE
Prepare your individual tins for pouring. Set them out on the counter for easy access.
Strain nettles from infused oil. Add your Vitamin E capsules and stir well. The oil will be very warm. Make sure to work quickly so that the oil stays warm while you are mixing the beeswax and Vitamin E into it. Make sure to get the Vitamin E spread throughout oil consistently. Add the shredded beeswax. Stir well as the beeswax melts into the oils. Pour into tins….LABEL. Make sure you label well. I use PicMonkey to design my labels. I like having nice pretty labels. Click HERE for info on PicMonkey for a graphics tool to design your labels…..I LOVE PicMonkey!!! It’s EASY to use. I buy a year subscription…
Nettle Tincture
- 1 pint jar/lid………………Click HERE
- 6 oz Nettle Leaves (Washed & Drained if Fresh….You can use DRIED NETTLE)…..Click HERE
- Dark Dropper Bottles (1 oz bottles)………..Click HERE
- Wooden Spoon………………………………………….Click HERE
- 90 Proof Vodka OR Apple Cider Vinegar if you want alcohol free tincture
- Cheesecloth for straining…………………………Click HERE
- Bowl for straining
- Masking Tape/Marker……………………………….Click HERE
- Tiny Stainless Steel Funnels for pouring into 1 oz. dark glass dropper bottles…………CLICK HERE
Place pint jar half full of nettle leaves (Pack tight if fresh leaves OR you can use Dried Nettle). Pour 90 proof to top of jar, place lid on the jar, put a piece of masking tape on the front of the jar and label with a marker, store for 3 weeks in a dark, cool area. Remember to shake at least once per day. This will force the constituents out of the leaves and into the vodka, making the INFUSION that you need to occur, to be more potent.
By using a piece of masking tape for this step of labeling, it makes it easy to remove the tape from the jar when the tincture is ready to bottle in the dropper bottles.
After 3 weeks, take a bowl with a piece of cheesecloth draped over the top of it and pour the vodka and nettles from the pint jar onto the cheesecloth, allowing it to separate and filter the tincture away from the nettle leaves. Squeeze the nettle leaves to make sure all the vodka filters through the cloth. I wrap the leaves up into the cheesecloth and squeeze it firmly to release all the liquid into the lower bowl. Discard the leaves and wash your cheesecloth. I have small stainless steel funnels that I use to pour tincture into the 1 oz. dark glass dropper bottles. Label with your permanent labels on each dropper bottle. I make my labels on PicMonkey. If you want to visit the PicMonkey site, click HERE. They have a super platform to design your graphics. I get my dark dropper bottles HERE. I order my labels HERE. Oh, and if you are wondering what the ‘tiny funnels look like for pouring essential oils and tinctures, then you can click HERE to see the ones that I use.
Nettle Infused Oil
- COLD PRESSED Olive Oil…Click HERE
- 1 pint Mason Jars……………Click HERE
- 1 oz. dark glass dropper bottles………Click HERE
- 1.5 – 2 oz Fresh Nettle Leaves OR Dried Nettle Leaves…………..Click HERE
- Vitamin E Capsules………….Click HERE
Fill sanitized 1 pt Mason Jars halfway full with 1.5 – 2 0z Nettle (Dried or Fresh) If fresh, make sure to pack the jar well. Add COLD PRESSED Olive Oil to the top of the jar. Put Lids on and store in a dark, cool area for 3 weeks. You must shake daily.
OR
To save time, you can make a quicker oil infusion by placing a baking dish in the oven with a ratio of 1:2 oil to nettle. Preheat oven to 200 degrees and leave in the oven for 3.5 hrs. The heat will force the components inside the Nettle leaves to dissolve into the oil. Keep a close eye on the dish while in the oven.
Remove dish from oven, break 5 vitamin E capsules into the oil and stir. Store in 1 oz. bottles for personal use. You may store in pint size Mason jars or an Olive Oil glass jar used for topping salads…..Click HERE for a really nice oil jar for serving at guest events. Keep in a dark, cool area. Make sure to label well. I make my design my labels on PicMonkey… Click HERE to check out PicMonkey. Also, for convenience sake, I buy my labels HERE.
`
Nettle Infused Lemonade
- Fresh Washed Nettle Leaves OR Dried Nettle Leaves……Click HERE
- 1 Gallon Water
- 5 lemons
- Clear Glass Container…………Click HERE
Boil water and Nettle leaves into a tea. Add the juice of 3 lemons. Add Organic powdered Stevia to taste. Stir well while warm. Add 2 lemons sliced to the Nettle Lemonade. Refrigerate. Serve on Ice…
Plantain…..A natural healing herb that most likely grows in your own yard…
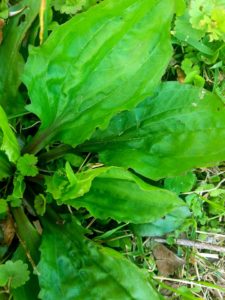
It’s finally May 2018 and we are well past the daffodils blooming in the early part of Spring… Indeed, we have had an unusual kind of ‘Spring’ this year. I was beginning to wonder if Spring would ever fully arrive. Winter kept hanging on with all its power until the last minute. Oh, but now the broadleaf plantain is growing and doing well in most North American yards, roadsides, and meadows. It is a very common plant to the entire world, practically.
I suppose this is where I have to add my DISCLAIMER……yadda, yadda, yadda….It’s necessary, so here goes:
DISCLAIMER:
I AM NOT A DOCTOR, PLUMBER, NOR AN ELECTRICIAN. I CANNOT AND DO NOT GIVE MEDICAL ADVICE. EVERYTHING I SHARE OR INSINUATE IN THIS BLOG NEEDS TO BE DISCUSSED WITH YOUR MEDICAL PROFESSIONAL. NOTHING I WRITE, SAY, OR INSINUATE IS MEANT TO PREVENT, DIAGNOSE, TREAT, OR CURE ANY AILMENT OR MEDICAL CONDITION. YOU MUST DO YOUR OWN RESEARCH AND DISCUSS EVERYTHING WITH YOUR MEDICAL PROFESSIONAL. I TAKE NO RESPONSIBILITY FOR YOUR USE OF ANY SUBSTANCE OR PLANT THAT YOU MAY USE. BE VERY CAREFUL AND KNOW IF YOU ARE ALLERGIC TO PLANTS OR SUBSTANCES BEFORE USING OR INGESTING THEM. AGAIN, DISCUSS THIS WITH YOUR MEDICAL PROFESSIONAL FIRST BEFORE USING TOPICALLY OR INGESTING ANYTHING MENTIONED IN MY BLOG. I ONLY SHARE MY PERSONAL EXPERIENCE AND THIS BLOG IS INTENDED AS AN EDUCATIONAL EXPERIENCE ONLY.
OK, NOW THAT THAT ‘STUFF’ IS OVER WITH, LET’S GET INTO THE SUBJECT OF THIS ARTICLE AND ‘TALK SOME ‘TURKEY” ABOUT PLANTAIN…….HERE WE GO…..
I’m getting geared up to pull out my plantain recipes. I keep them carefully tucked away inside my May recipe folder. It’s been a couple years since I’ve had to make any plantain concoctions.
Last year, we had just moved and our every spare minute was spent on remodeling the house. I look forward to getting in the kitchen with my wild plant recipes this year. I’ve already dried plenty of dandelion root this Spring and I’ll use the roots for tea blends.
We had some great early Spring salads from dandelion leaves. I wanted to make dandelion jelly this year, but considering the dandelion blooms are already starting to fade away for the season, I might have to wait until next Spring for the jelly. I use the dandelion flowers to make the jelly.
However, for now, I’m concentrating on PLANTAIN. Plantain has been a ‘staple’ in my medicine cabinet for years. In fact, I remember, when I was around 5 years of age (49 years ago), my grandmother taking an eyedropper of plantain tincture and holding me down on her sofa to drop the tincture into my aching ear. I had a really bad ear infection and she treated me with plantain tincture, she also blew tobacco smoke into my ear, dropped sweet oil into my ear canal, and I can’t forget the old sock she kept in the cupboard full of rice & salt for times like that. She would lay it over my ear and dare me to move from that position on the pillow…LOL… I loved her!! We were just common folk and couldn’t afford to go to the doctor every “whip stitch”, as she would say. LOL…..God love her…She was a good, GOOD, soul.
Therefore, rightfully so, plantain has been a medicinal herb in my grandma’s home since she was a child. Her mother, (my great-grandmother, Josie) taught her children to identify healing herbs and how to use them. My great grandmother was known in ‘her part of the woods’ to heal others with her herb concoctions…
Moreover, my little grandma became kind of well known for her plantain salves, tinctures, and other wild plant remedies back ‘in the day’. One of the most popular items she made was a special plantain salve for diaper rash. I still have that recipe from my great-grandma’s trunk that my grandmother used. My grandma gave her diaper rash salve, made from plantain leaves & other wild plants, away as gifts to all the young mothers in church and around where she lived. She couldn’t afford fancy gifts, so she made extra of everything and shared it with family & friends. Christmas would have broken her if she had bought for all of us…We had at least 60 around the table during the holidays, if not more. She cooked single-handedly for all of us. So, we bought for her, instead. She deserved it.
Far before my great-grandmother used plantain, the healing benefits of plantain were documented by the Greek physician, Dioscorides. Dioscorides lived before 100BC. He was a Greek physician, botanist, & pharmacist in the Roman military. He used plantain for treating wild animal bites, as well as dog bites. Many throughout history have known plantain to be a great remedy for earaches, asthma, mouth inflammatory issues, and even epilepsy. You can see how valuable this plant once was before it was ‘swept under the rug’ by the ‘system’ that could not profit from it.
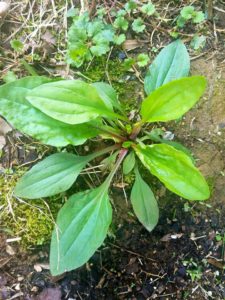
Tomorrow, I’ll be collecting fresh plantain leaves from our property for a new batch of 2018 plantain tincture. I’ve used up all of my stock on plantain tincture except for 2 small jars that were hidden at the back of my cabinet… I like to keep plenty tinctures on hand for gifts, as well as, for our own personal use. A plantain tincture is great for using to treat wounds or rashes. It’s great especially for the little ones that play outside during the summer months… I have 5 (soon 6) grandchildren and they are always getting bug bites, knees ‘skinned’, and experiencing earaches and other healing crisis issues. Thank goodness, they are each very familiar with natural healing options. One of the biggest benefits I have found for plantain tincture is CHIGGER BITES!!! Oh, yes sirreeee, my grandkids get their share of chiggers. The plantain tincture soothes the itching for them at night.
In fact, if anyone around me gets bit by an insect or stung by a bee, I grab the plantain tincture or break off a fresh leaf of plantain in the grass where we stand and smash its juices to rub immediately on the bite area. It’s great for applying to poison ivy. Yes, ma’am, plantain is a prize substance in my home. It has multiple benefits and the tincture, salves, and dried leaves have their own special spot on the shelf in my medicine closet.
I often keep a small spray bottle of plantain tincture in my purse during the summer months for insect bites. If I hear of someone complaining about a ‘bug bite’, a quick spritz of plantain tincture helps to soothe the itching and burning.
In addition to topical benefits, I follow my grandmother’s ways and just as she served her family, I often pick fresh plantain leaves, wash them, and include them in our dinner salad. I often mix them with dandelion leaves and fresh lettuce like my Mom did when we were little. We always planted lettuce when we planted tobacco plants. It grew under the tobacco canvas at the end of the tobacco beds. My grandmother always burned a spot in her backyard for a lettuce bed every Spring.
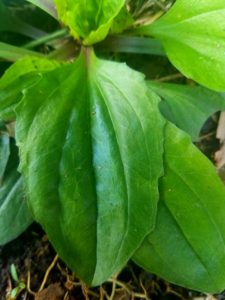
Plantain leaves can even be boiled like other green leafy vegetables. (like spinach, for example). The younger leaves are best for salads, whereas, the older, larger leaves are great to boil. As for my way of preparing cooked plantain leaves, I add a bit of fresh homemade butter to the strained leaves after boiling, salt & pepper for seasoning.
My granny, as well as, my mother always included fried bacon in our salad and then poured the hot bacon grease over our greens in the Springtime. Yum, it was good. That was way back before all the ‘new studies’ warned us about fats being so dangerous. You know, back when we all ate fat and no one was fat… LOL….. Freshly picked plantain makes for a healthy green leafy food option during the summer months. It’s kind of sad that years and generations of ‘conditioning’ have buried the knowledge of the plantain plant. However, the medicinal properties of this plant that most consider to be just a ‘weed’ and to be of no value, are seriously to be highly respected. Yes, we foolishly fail to realize the healing components that this plant offers to the world.
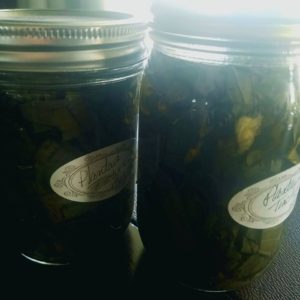
These are 2 jars of PLANTAIN TINCTURE left over in my cabinets. Rarely do I have any left over. These must have gotten misplaced in our move
Plantain leaves are rich in nutrients such as magnesium, calcium, potassium, zinc, copper, Vitamin A, K, & C, as well as, healing components like tannins, which reduce blood pressure, clot blood, and other physiological benefits. Europeans have used the plantain plant for treating SCURVY, due to its high vitamin C content. In addition, plantain also has salicylic acids, which are used for topical benefits like treatment for calluses, warts, psoriasis, dandruff, acne, etc…
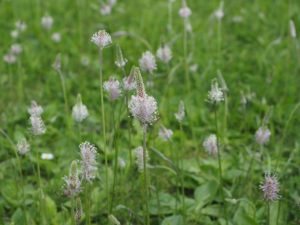
The photo above is of the seed pods and flowers that bloom from the PLANTAIN plant
Keep in mind, there are 2 primary types of plantain, YET, there are over 34 species around the world. One primary species is called the BROADLEAF PLANTAIN and has a wide ribbed leaf. Whereas, the other common type of plantain has a longer, more narrow leaf and is called the RIBWORT PLANTAIN. They both have impressive health benefits and are both common ‘weeds’ found along the roadsides around the world.
As for some of the healing constituents found in these valuable leaves, one of the first components is called glycosides. The glycosides found in the leaves are VERY valuable and are used as antibacterial, anticancer, antiviral, anti-inflammatory, antifungal, antioxidant, antitumor, protection to the liver, and even antidiabetic benefits……(C-glycosides are HUGE in the treatment of many conditions…
Allantoin is another vital component found in the leaves of plantain and allantoins are often used in a mixture with phenols, camphor, and other constituents for skin irritation, chapped lips, itching, etc..
Phenols are often found in fruits and vegetables. Phenols are found in the plantain leaf. They are strong antioxidants and are very potent. Although the plantain leaf is generally considered quite safe when it comes to the number of phenols found in the leaf itself, phenols in high concentration can be quiet dangerous. Too much is not good, but one of the valuable health benefits of phenol is that of a neurolytic capacity, which means it serves as a ‘nerve block’ and can help with pain. Hence, one of the reasons for using plantain leaves for bug and snake bites.
Phytochemicals, another important component of plantain leaves are known for their diuretic benefits, as well as, antifungal, antiviral, anti-inflammatory, enhances HDL levels, helps with MULTIPLE cancers, HIV treatment, they have antimicrobial benefits, help in the treatment of atherosclerosis, have analgesic benefits, etc…
So, as you can see, PLANTAIN can be a rather ‘heavy hitter’ in anyone’s medicine cabinet. Best of all, it grows wild almost EVERYWHERE…….Go find some!!
Below I’m leaving you a few plantain recipes and directions on how you can make your own plantain tincture, a plantain drawing salve, plantain salad, & plantain tea.
AFFILIATE DISCLOSURE
The FEDERAL TRADE COMMISSION released new requirements on TRADE DISCLOSURES in 2015 for all internet marketing/e-commerce. These new disclosures are to make sure that all sites are compliant with the newly updated FTA standards in e-commerce. Please note that all sites involved in affiliate marketing have since been required to let their readers know that the website owner could receive a small compensation when a visitor clicks on an affiliate link leading to a purchase of a product(s) by that reader with whatever company that the link is affiliated with…
The price of the said product will remain the same for the customer, regardless if they purchase directly from the affiliate site or via clicking a link on this website. The small compensation is paid from the affiliate to the website owner only if a customer clicks the website owners link.
All Affiliate Disclosures must be posted in a non-conspicuous area of the blog in clear site for all readers to quickly see and needs to give the names of the website owner and the affiliated party. (Ex: The Appalachian Sage Blog is the website owner, herein, and for example, the affiliate might be Amazon or any other direct affiliate website) .
Please note that ‘The Appalachian Sage’ blog is an affiliated site with varioBotanicals, etc… Yes, we do make a small percentage, but that minute amount helps me to keep bringing you wonderful content on this blog.
Per FTC Compliance, definitely, assume that all links and posts on my site (The Appalachian Sage blogsite) will lead to an affiliate website or product. Any and all links on ‘The Appalachian Sage’ blog could result in me receiving a small compensation from the affiliate. All purchases are made via the affiliate website and a customer is buying from the affiliate directly, not from ‘The Appalachian Sage’ blog site. Customer service will be handled by the affiliate, not ‘The Appalachian Sage’ blog site.
You will NOT pay any more by clicking on the links in ‘The Appalachian Sage’ blog site than you would if you went directly to the affiliate site. I appreciate your support.us companies including Amazon, Star
FIRST THINGS FIRST BEFORE YOU START MAKING YOUR PRODUCT RECIPES!!!!
- Collect your fresh leaves from an area that is not subjected to herbicide, pesticides, auto exhaust, or any other known toxin in the air, water, or environment. If you live in the ‘concrete jungle’ and don’t have time or property to harvest plantain from, then you may order dried plantain leaves HERE OR order Plantain Capsule Supplements by clicking HERE.
- If using fresh plantain leaves, then you must wash them, examine and throw away any leaves with spots or damage.
- Once you have washed and sorted the leaves well, then put them into a food processor to chop them up into smaller sections. I keep a couple food processors. One is a larger one for volume preparation and another is a smaller version for smaller food prep. You can click HERE for a large food processor like I own or HERE for the smaller food processor that I also often use.
- The leaves need to be put on drying screens or into a dehydrator to properly dry them before using in any salve recipe. The moisture must be removed TOTALLY from the leaf so that mold doesn’t form in your salve. If all mold is removed properly, then the salve will last much longer. I feel that the dehydrator is the best way of me making sure the leaves are properly dried. I purchased my dehydrator HERE. I set my dehydrator at 125-130 degrees and dry for several hours. I continually check the drying process. Make sure that when you add the chopped leaves to the dehydrator, that you scatter them thinly over the trays, leaving spaces for air to penetrate. This allows for faster, more thorough drying, as well.
- Once the leaves have dried completely, they are ready to use in salve recipes and for teas. Drying the leaves carefully helps to prevent mold from being in your finished products.
- You will also use Mason jars/lids for infusing your plantain into the olive oil. I use these HERE.
- It’s now time to INFUSE the components from the leaves into Olive Oil. You can do this at room temperature or by using a Crock Pot. If you need to buy a Crock Pot, then click HERE for a great crock pot.
- Should you choose to use a Double Boiler to infuse your leaves into the olive oil, you might want to check this super little double-boiler out HERE.
- After the infusion is completed, whether it be manually by waiting 2 weeks or enhanced with heat via the crock pot or double-boiler, you will need to remove the lids and add cheesecloth to the tops of each jar for straining. I buy my cheesecloth HERE.
- I keep several stainless steel bowls just for making my personal lotions, tinctures, cosmetics, soaps, and salve concoctions. I love these stainless steel bowls. I bought mine HERE.
- Beeswax beads or grated Beeswax will be used to mix with the infused olive oil. You can click HERE for Beeswax beads. Some have their own beehives at home and have access to large blocks of beeswax from their hives. If this is the case, then you will need to grate the beeswax for the recipe. Click HERE for a good grater to use to grate larger blocks of beeswax. (The good thing about all this is the fact that you may have some or most of these supplies already in your kitchen cupboards. If not, once you have your basic equipment, they can last you for years and you can use them for multiple purposes. After the initial setup of equipment, the cost of producing your own healing products each year will be minimum.)
- Click HERE for stainless steel bowls that I use for various projects.
- I love my silicone spatula. If you want to check the spatula out that I use, Click HERE.
- Bentonite Clay is great for drawing splinters, acne, boils, etc… I buy my Bentonite Clay HERE.
- As for your essential oils, you can use a variety. I prefer to use Tea Tree Essential Oil, (therapeutic oil ONLY). I buy this brand of Tea Tree Oil. Click HERE.
- You are also free to add additional THERAPEUTIC essential oils to your mixture. I also use Frankincense Essential Oil in my Plantain Salve. Click HERE. For Lavender Essential Oil, Click HERE.
- In addition, you will need either 2-4 oz small jars or 2-4 oz tins for your finished product. For small jars, I use these. Click HERE.
- If you would rather use TINS, then I find these to work great. Click HERE.
- Don’t forget your labels. I use these labels and they look super on jars or tins. Click HERE.
- When I make the tincture, I use 2 oz. dark glass dropper bottles. These are the dropper bottles I use. Click HERE.
- To make pouring tincture easier into the dropper bottles, I keep plenty of stainless steel funnels on hand that are perfect for small dropper bottles. Click HERE to see the funnels I use.
- If you should not have time to make your own Plantain Salve, then Click HERE for a jar of fine plantain salve to add to your medicine chest.
- I’ll share the organic stevia powder that I use. I don’t buy stevia with Maltodextrin. I buy 100% natural only stevia. HERE is what I use.
- So…LET’S GET ON WITH THE ‘SHOW’ and make some healing products for your medicine cabinet…
PLANTAIN RECIPES
- Plantain Salve
- Plantain Tincture
- Plantain Tea
- Plantain Shrimp Salad
- Plantain Leaf Juice
- Plantain Infused Oil
- Plantain Poultice
Plantain Salve
Ingredients:
- Dried Plantain Leaves
- Grated Beeswax OR Beeswax Beads
- Olive Oil
- Bentonite Clay
- Frankincense Essential Oil
- Lavender Essential Oil
- Tea Tree Essential Oil
Supplies:
- Crock Pot OR Double-Boiler
- Large Stainless Steel Bowl
- Silicone Spatula
- Grater for the Beeswax
- Cheesecloth
- Rubber Bands
- Jars for infusion purposes (1 pint Masons are great)
- Small Jars or Tins (2-4 oz) for the final product
- Labels
First, take your chopped dried plantain leaves and put them into small jars and pack the leaves well into the jar. Once the jar is packed with dried plantain leaves, fill to the top with Olive Oil. Put the lid on the jar and store in a cabinet for about 2 weeks at room temperature. (A great time saver is to set the jars in a crockpot with water coming halfway up the jar and heat for several hours. The warmth will help to infuse the healing components inside the plantain leaves into the olive oil OR put jars into a double boiler and boil for 35 minutes.)
While waiting for the oil to become infused, prepare your final product jars or tins. Make sure they have been washed and sanitized well. They must be dry for pouring. Place them on the table or countertop for easy pouring of the final mixture into them.
After several hours of the infused oil sitting in the warm water, then take the lids off, cover the mouth of the jars with cheesecloth, using a rubber band to secure the cloth to the jar, and strain the olive oil into a separate bowl. Discard the chopped plantain at this point. After the plantain leaves are discarded, then use a stainless steel mixing bowl large enough to hold your oil and grated beeswax. For every cup of infused olive oil, add 1/4 cup of shredded/grated beeswax. Add 3 tsp of Bentonite Clay (This is the drawing agent used in the salve) to every 1/4 cup of infused olive oil. Add 12 drops of Frankincense, 12 drops of Tea Tree, 12 drops of Lavender to every 1/4 cup of infused olive oil.
Put stainless steel bowl, full of ingredients, into a large pan of water and heat on low. Continually stir the mixture until blended well. Once the mixture has a smooth consistency, then immediately pour into the final jars or tins. I use a silicone spatula to clean the bowl well, so as to use every drop possible.
After pouring into 2-4 oz final containers (jars or tins), allow to cool and harden BEFORE adding lids to containers. Put lids on the jars or tins and then carefully label each container properly. WAAAAA LAAAA…PLANTAIN DRAWING SALVE.
(KEEP IN MIND, IF THE CONSISTENCY OF THIS SALVE RECIPE IS TOO HARD, REMELT IT, THEN JUST POP IN A BIT MORE OIL AND IT SHOULD SOFTEN TO DESIRED CONSISTENCY. IF TOO SOFT, THEN REMELT AND ADD MORE BEESWAX TO GET A FIRMER MIXTURE.)
Use as needed by applying topically to bug bites, spider bites, snake bites, cuts, itchy skin, bruises, scrapes, splinters, thorns, ingrown hairs, bee stingers, etc…
Plantain Tincture
SUPPLIES
- Fresh Plantain
- 100 Proof Vodka (50% Alcohol)
EQUIPMENT
- Food Processor for chopping plantain leaves
- 1 Pint Mason Jars/Lids
- Large Stainless Steel Bowl
- Cheesecloth for straining leaves from alcohol
- Large Rubber Band
- Small Stainless Steel Funnel
- 2 Oz. Dark Glass Dropper Bottles w/Dropper
- Labels for Dropper Bottles
Put fresh plantain leaves into a food processor to chop leaves into smaller pieces. Then, pack chopped leaves into 1 pint Mason jars. Pour 100 proof vodka over the leaves to fill jars. Make sure all leaf pieces are submerged well into the vodka. Put lids on the jars and store in dark, cool cabinet for 6 weeks. This is when the infusion takes place.
After 6 weeks, prepare & sanitize your dropper bottles. Set them out on working table or countertop so that they are ready to fill with tincture. Next, remove lids from the infused tincture jars, place cheesecloth over the rim of the jars. You may want to secure the cheesecloth with a rubber band. Slowly pour out into a large stainless steel bowl. This will separate the leaves from the infused vodka. Discard the leaves and then pour the infused vodka into 2 oz dark glass dropper bottles. I use a small stainless steel funnel to make the pouring easier into the small 2 oz. bottles. HERE is an example of the funnel I use. Label each glass bottle properly and store them in a cool, dry area.
Plantain Tea
Supplies:
- Dried or Freshly picked Plantain Leaves
- Spring Water
- 100% Organic Natural Stevia Powder (NOT the big box version with Maltodextrin)
Equipment:
- Pan for steeping tea leaves in Springwater
- Large 2 Gallon Glass Container w/a spout for pouring and used for refrigerator storage for tea.
Boil spring water in a small pan. Pour this boiling water over fresh or dried plantain leaves in a bowl. Allow the boiling water to cool naturally while being infused with the plantain leaves. (Do NOT use tap water since it contains FLUORIDE.) Allow the boiling water to cool naturally to room temperature, strain the leaves from the water. I sprinkle organic stevia into the tea and stir well. (Although, many drinks with no form of sweetener). Serve & ENJOY!!! I store this tea in my refrigerator up to 14 days. I love it on the ice, as well as, drinking it warm. I love these 2-gallon glass containers with pouring spout for my tea storage in the refrigerator. The spout makes it so easy to pour a glass or cup without removing the entire container from the refrigerator. You can see what I use HERE.
My grandmother drank plantain tea as a way of controlling her pain from gout. It helps to release uric acid from the kidneys. This tea can be a relief, indeed.
Plantain Shrimp Salad
Supplies:
- 1 cup Fresh Plantain Leaves
- 1 cup Fresh Dandelion Leaves
- 2 cups Romaine Lettuce
- 2 Garden Tomatoes
- 4 medium fresh Garden Green Onions
- 1 cup Cheddar Cheese sprinkles
- 12 Large Butter Fried Shrimp (Deveined/Detailed)
- Homemade Butter
- Mrs. Dash Spicy
- Salt
- Pepper
Equipment:
- You can click HERE. I buy my Mrs. Dash Spicy mix HERE. I only cook the shrimp for a short time until shrimp is thawed and seasoned well.
Ok, its time to place the plantain leaves, dandelion leaves, & chopped romaine lettuce into a large mixing bowl. I ozone the remaining vegetables, chop them and add them to the salad bowl mixture of green leafy vegetables already in the bowl. I cut the tomatoes into small wedges, add 1 cup of shredded cheese, salt, & pepper. I then add my dressing of choice. I top with the 12 butter fried shrimp…….Serve & ENJOY!!
Plantain Leaf Juice
Ingredients:
- Fresh Plantain Leaves
- 100% Organic Stevia Powder
- Spring Water
Equipment:
- Juicer
- 8 oz glass
- tsp for stirring
Put fresh plantain leaves into a juicer. Collect the juice and put into a small jar for refrigerator storage. You can keep up to 5 days in the refrigerator. Make no more than 2 1/2 oz at one time, in order that the enzymes be fresh when consumed.
Each morning (mainly in the spring months), I put 1/2 oz of plantain juice into an 8 oz. glass. I add spring water to fill the glass and a few sprinkles of 100% organic stevia powder, including a squirt of lemon juice and drink first thing on an empty stomach.
Plantain Infused Oil
Plantain Poultice